Build treemap charts with Kibana
Elastic Cloud Serverless projects are autoscaled environments, fully managed by Elastic and available on Elastic Cloud. Availability This functionality is generally available and ready for production usage. Serverless interfaces and procedures might differ from classic Elastic Stack deployments. The Elastic Stack includes Elastic's core products such as Elasticsearch, Kibana, Logstash, and Beats. Availability This functionality is generally available and ready for production usage. Unless stated otherwise on the page, this functionality is available when your Elastic Stack is deployed on Elastic Cloud Hosted, Elastic Cloud Enterprise, Elastic Cloud on Kubernetes, and self-managed environments. This documentation corresponds to the latest patch available for each minor version. If you're not using the latest patch, check the release notes for changes.
Serverless
Generally available
Stack
Generally available
Treemap charts display hierarchical data as nested rectangles, where each rectangle's size represents a quantitative value. They are ideal for showing part-to-whole relationships within hierarchies, comparing relative sizes of categories, and visualizing how data is distributed across multiple levels.
You can build a treemap chart in Kibana in either of these ways:
To automate chart or dashboard creation, use the Dashboards and Visualizations APIs. To create dashboards from natural-language instructions, use Elastic Agent Builder or the Kibana dashboards agent skill.
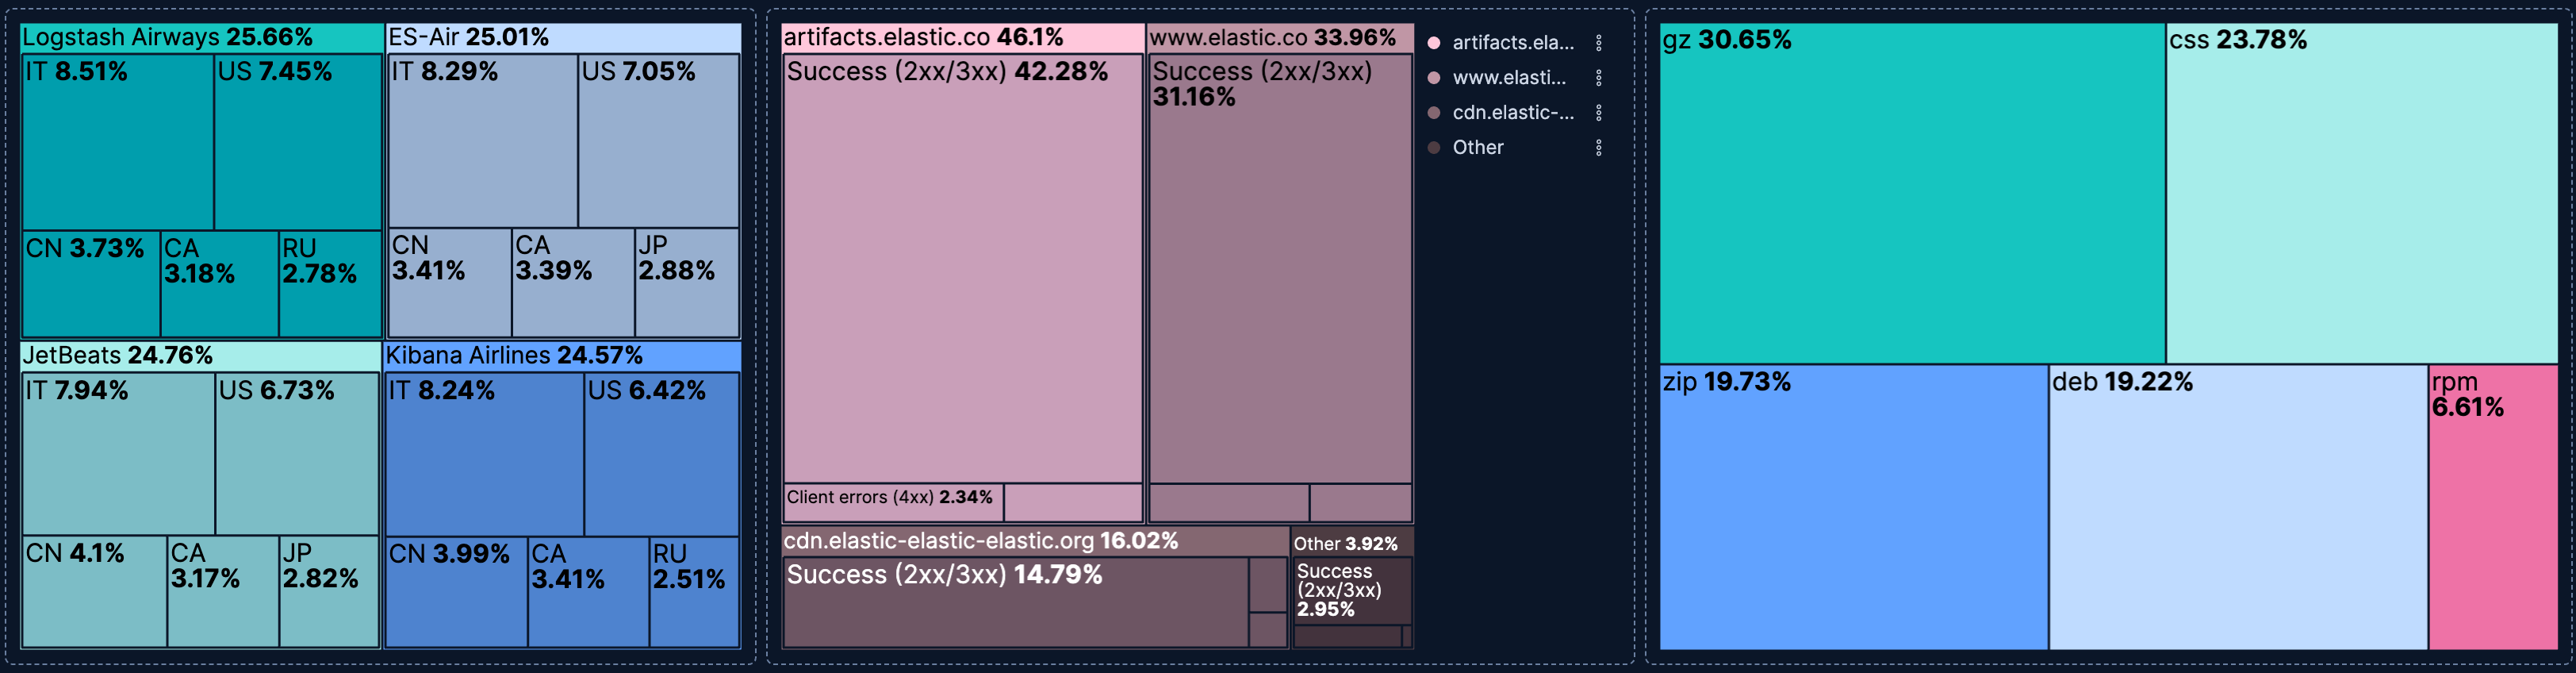
Before you start, make sure you have data indexed into Elasticsearch or install sample data. The point-and-click editor uses data views to access your Elasticsearch data. Data views are usually created automatically when you ingest data. You can also create one manually to select the data that you want.
To build a treemap chart:
-
Lens is Kibana's main visualization editor. You can access it:
- From a dashboard: On the Dashboards page, open or create the dashboard where you want to add the visualization, then add a new visualization.
- From the Visualize library, by opening it and creating a new visualization.
-
New visualizations often start as Bar charts.
Using the Visualization type dropdown, select Treemap.
-
- Select the data view that contains your data.
- Configure the Group by dimension to define how the rectangles are grouped. Add multiple Group by dimensions to create a hierarchy.
- Configure the Metric dimension to define the size of each rectangle.
The chart preview updates to show rectangles sized by your metric. If you added multiple Group by dimensions, smaller rectangles appear nested inside the top-level categories.
-
- If you accessed Lens from a dashboard, select Save and return to save the visualization and add it to that dashboard, or select Save to library to add the visualization to the Visualize library and be able to add it to other dashboards later.
- If you accessed Lens from the Visualize library, select Save. A menu opens and lets you add the visualization to a dashboard and to the Visualize library.
Before you start, make sure you have data indexed into Elasticsearch or install sample data. ES|QL queries the indices named in the query directly, so you do not need a data view. The columns returned by the query become available as chart dimensions. Refer to Visualizations using ES|QL queries to learn how to open the editor, shape the query result for a visualization, and save the visualization.
A treemap needs a categorical column to define its rectangles and a numeric metric column to determine their size. In this query, BY returns one row for each file extension, SUM provides its total transferred data, and SORT and LIMIT retain the six extensions with the most transferred data:
FROM kibana_sample_data_logs
| STATS total_bytes = SUM(bytes) BY extension.keyword
| SORT total_bytes DESC
| LIMIT 6
To build the chart:
- Create an ES|QL visualization and run the query.
- Set the visualization type to Treemap.
- Assign
extension.keywordto Group by andtotal_bytesto Metric. - Customize the chart appearance using the treemap chart settings.
- Select Apply and close.
The chart preview shows larger rectangles for file extensions with more transferred data.
After building the chart with the point-and-click editor or an ES|QL query, customize its appearance for your data and audience:
- Limit hierarchy depth
- Keep your treemap to 2-3 levels of hierarchy. Deeper nesting becomes difficult to read and interpret.
- Order categories by size
- Arrange rectangles by size (largest first) to make comparisons easier. This is the default behavior in Lens.
- Use color meaningfully
- Apply colors to distinguish top-level categories or to represent an additional metric (such as growth rate or status).
- Ensure readable labels
- Labels are automatically hidden on rectangles that are too small to fit them. If too many labels are missing, reduce the number of categories or increase the panel size.
Refer to Treemap chart settings for all treemap chart configuration options. For panel sizing and layout guidance, refer to Organize dashboard panels.
Customize your treemap chart to display exactly the information you need, formatted the way you want.
The Group by dimension defines how rectangles are grouped. You can add up to 2 levels of grouping to create hierarchical visualizations.
- Data
-
The Group by dimension supports the following functions:
- Top values: Show the most common values of a field.
- Field: Select the field to group by. You can add up to 4 fields to create multi-term groups. When multiple fields are selected, each group represents a unique combination of values across those fields. You can reorder the fields by dragging them to change their priority.
- Number of values: How many top values to display. The default number of values depends on your environment:
- Elastic Cloud Serverless projects are autoscaled environments, fully managed by Elastic and available on Elastic Cloud. Availability Generally available This functionality is generally available and ready for production usage. Serverless interfaces and procedures might differ from classic Elastic Stack deployments. The Elastic Stack includes Elastic's core products such as Elasticsearch, Kibana, Logstash, and Beats. Availability Generally available since 9.4 This functionality is generally available and ready for production usage. Unless stated otherwise on the page, this functionality is available when your Elastic Stack is deployed on Elastic Cloud Hosted, Elastic Cloud Enterprise, Elastic Cloud on Kubernetes, and self-managed environments. This documentation corresponds to the latest patch available for each minor version. If you're not using the latest patch, check the release notes for changes. Defaults to 9.
- The Elastic Stack includes Elastic's core products such as Elasticsearch, Kibana, Logstash, and Beats. Availability Generally available from 9.0 to 9.3 This functionality is generally available and ready for production usage. Unless stated otherwise on the page, this functionality is available when your Elastic Stack is deployed on Elastic Cloud Hosted, Elastic Cloud Enterprise, Elastic Cloud on Kubernetes, and self-managed environments. This documentation corresponds to the latest patch available for each minor version. If you're not using the latest patch, check the release notes for changes. Defaults to 5 for the first Top values dimension added to the chart and 3 for each additional one.
- Rank by: Specifies the dimension the top values are ranked by. Available options:
- Count of records: Rank by the number of documents containing each value. This is the default when a metric is defined.
- Alphabetical: Rank by the term key alphabetically. This is the default when no metric is defined.
- Rarity: Find terms that appear in very few documents, using a rare terms aggregation. You can configure the Max doc count per term to set the maximum number of documents a term can appear in to be considered rare (default: 1, max: 100). Available for single-field terms only, and not for floating-point numeric fields (
float,double,half_float, andscaled_float). - Significance: Find statistically unusual terms compared to the overall data set, using a significant terms aggregation. Only available for
keywordfields and single-field terms. - Custom: Define a custom metric aggregation to rank by (for example, rank by the sum of a numeric field rather than by count).
- Rank direction: Ascending or descending order. Disabled when Rank by is set to Rarity or Significance.
Advanced settings
Several advanced options allow you to refine the behavior of the breakdown:
- Include documents without the selected field: Off by default.
- Group remaining values as "Other": On by default.
- Enable accuracy mode: This option improves results for high-cardinality data, but increases the load on the Elasticsearch cluster.
- Include values: Values from the dimension to always include, even if they aren't among the top values. You can enter exact values or a regular expression.
- Exclude values: Values from the dimension to always exclude. You can enter exact values or a regular expression.
- Date histogram: Group data into time-based buckets.
- Field: Select the date field to use for the time-based grouping.
Include empty rows: Include buckets that contain no matching documents. Existing saved visualizations keep their configured setting.
The Elastic Stack includes Elastic's core products such as Elasticsearch, Kibana, Logstash, and Beats. Availability Generally available since 9.5 This functionality is generally available and ready for production usage. Unless stated otherwise on the page, this functionality is available when your Elastic Stack is deployed on Elastic Cloud Hosted, Elastic Cloud Enterprise, Elastic Cloud on Kubernetes, and self-managed environments. This documentation corresponds to the latest patch available for each minor version. If you're not using the latest patch, check the release notes for changes. Elastic Cloud Serverless projects are autoscaled environments, fully managed by Elastic and available on Elastic Cloud. Availability Generally available This functionality is generally available and ready for production usage. Serverless interfaces and procedures might differ from classic Elastic Stack deployments. For new visualizations, this option is:
- On by default for tables, line charts, and area charts
- Off by default for bar charts, heat maps, pie charts, treemap charts, mosaic charts, waffle charts, metric charts, and tag clouds
When you switch visualization or series type, Lens applies the default for the new type. If you switch back to the visualization type you saved, Lens restores the saved setting.
The Elastic Stack includes Elastic's core products such as Elasticsearch, Kibana, Logstash, and Beats. Availability Generally available from 9.0 to 9.4 This functionality is generally available and ready for production usage. Unless stated otherwise on the page, this functionality is available when your Elastic Stack is deployed on Elastic Cloud Hosted, Elastic Cloud Enterprise, Elastic Cloud on Kubernetes, and self-managed environments. This documentation corresponds to the latest patch available for each minor version. If you're not using the latest patch, check the release notes for changes. This option is on by default for all visualization types.
Bind to global time picker: Associate the selected field to the Lens or dashboard main time selector.
Minimum interval: Define the time interval for aggregating the data. For example,
30s,20m,24h,2d,1w,1MDrop partial intervals: Exclude incomplete intervals from the data. This option is off by default.
- Intervals: Create numeric ranges for continuous data by grouping a numeric field into buckets.
- Field: Select the numeric field to create intervals from.
- Intervals granularity: Use the slider to control how many intervals to create. Kibana divides the field into evenly spaced intervals (incremented by 10, 5, or 2) between the field's minimum and maximum values. The minimum granularity is 1, and the maximum is set by the
histogram:maxBarsadvanced setting. - Create custom ranges: Define your own ranges with specific lower and upper bounds and optional labels, instead of using the automatic granularity.
- Include empty rows: Include intervals that contain no matching documents. Existing saved visualizations keep their configured setting.
The Elastic Stack includes Elastic's core products such as Elasticsearch, Kibana, Logstash, and Beats. Availability Generally available since 9.5 This functionality is generally available and ready for production usage. Unless stated otherwise on the page, this functionality is available when your Elastic Stack is deployed on Elastic Cloud Hosted, Elastic Cloud Enterprise, Elastic Cloud on Kubernetes, and self-managed environments. This documentation corresponds to the latest patch available for each minor version. If you're not using the latest patch, check the release notes for changes. Elastic Cloud Serverless projects are autoscaled environments, fully managed by Elastic and available on Elastic Cloud. Availability Generally available This functionality is generally available and ready for production usage. Serverless interfaces and procedures might differ from classic Elastic Stack deployments. For new visualizations, this option is:
- On by default for tables, line charts, and area charts
- Off by default for bar charts, heat maps, pie charts, treemap charts, mosaic charts, waffle charts, metric charts, and tag clouds
When you switch visualization or series type, Lens applies the default for the new type. If you switch back to the visualization type you saved, Lens restores the saved setting.
The Elastic Stack includes Elastic's core products such as Elasticsearch, Kibana, Logstash, and Beats. Availability Generally available from 9.0 to 9.4 This functionality is generally available and ready for production usage. Unless stated otherwise on the page, this functionality is available when your Elastic Stack is deployed on Elastic Cloud Hosted, Elastic Cloud Enterprise, Elastic Cloud on Kubernetes, and self-managed environments. This documentation corresponds to the latest patch available for each minor version. If you're not using the latest patch, check the release notes for changes. This option is on by default for all visualization types.
- Filters: Define custom KQL filters. Each filter creates one group from the documents that match its query.
- Collapse by: Aggregate all metric values that share the same value for this dimension into a single number, removing it as an independent grouping. Available aggregation methods:
Sum,Min,Max, orAverage.
- Top values: Show the most common values of a field.
- Appearance
-
- Name: Customize the legend label.
- Color mapping: Select a color palette or assign specific colors to categories. Refer to Assign colors to terms for details. Color mapping is only available on the first Group by dimension. Nested levels inherit colors from their parent category.
The Metric dimension defines the size of each rectangle.
- Data
-
The value that determines rectangle size. When you drag a field onto the chart, Kibana suggests a function based on the field type. You can use aggregation functions like
Sum,Average,Count,Median, and more, or create custom calculations with formulas.Advanced settings
Depending on the data you defined, several options allow you to apply additional filtering to the data taken into account to compute the final value to show.
Based on the type of visualization you're creating, only some of the following options can be available:
- Normalize by unit: Normalize the metric values to show per unit of time.
- Filter by: Specify a query.
- Reduced time range: Reduce the time range specified on the dashboard's time filter by the specified duration.
- Time shift: Shift the time range by the specified duration. This is useful if the value should use a different time range than the one selected on the dashboard.
- Hide zero values: Don't show values equal to zero. This option is on by default.
- Appearance
-
- Name: Customize the metric label displayed in tooltips and legends.
- Value format: Control how numeric values are displayed (number, percent, bytes, and more).
When creating or editing a visualization, you can customize several appearance options from the
Style or  Legend menus.
- Slice labels
-
Control how labels appear on rectangles:
- Show: Display labels on all rectangles where space permits (default).
- Hide: Do not display labels on rectangles.
- Slice values
-
Control what values appear on rectangles:
- Percentage: Display the percentage of total (default).
- Integer: Display the raw numeric value.
- Hide: Do not display values.
When displaying percentages, you can also configure the Decimal places (default: 2).
- Visibility
-
Specify whether to automatically show the legend or hide it:
- Auto: Hide the legend (default).
- Show: Always show the legend.
- Hide: Never show the legend.
- Width
-
Control the width of the legend panel. Select Auto, Small, Medium, Large, or Extra large. Auto sizes the legend to fit its labels, and the other options set a fixed width. The default and available options depend on your environment:
- Elastic Cloud Serverless projects are autoscaled environments, fully managed by Elastic and available on Elastic Cloud. Availability Generally available This functionality is generally available and ready for production usage. Serverless interfaces and procedures might differ from classic Elastic Stack deployments. The Elastic Stack includes Elastic's core products such as Elasticsearch, Kibana, Logstash, and Beats. Availability Planned We plan to add this functionality in a future Elastic Stack update. Subject to changes. Unless stated otherwise on the page, this functionality is available when your Elastic Stack is deployed on Elastic Cloud Hosted, Elastic Cloud Enterprise, Elastic Cloud on Kubernetes, and self-managed environments. This documentation corresponds to the latest patch available for each minor version. If you're not using the latest patch, check the release notes for changes. Auto is the default.
- The Elastic Stack includes Elastic's core products such as Elasticsearch, Kibana, Logstash, and Beats. Availability Generally available from 9.0 to 9.5 This functionality is generally available and ready for production usage. Unless stated otherwise on the page, this functionality is available when your Elastic Stack is deployed on Elastic Cloud Hosted, Elastic Cloud Enterprise, Elastic Cloud on Kubernetes, and self-managed environments. This documentation corresponds to the latest patch available for each minor version. If you're not using the latest patch, check the release notes for changes. Medium is the default. Auto is available in the interface only for charts whose width is already set to Auto, for example charts created with the API, or charts created before 8.3 that had no width set.
- Label truncation
- Toggle whether to truncate long legend labels. When enabled, set the Line limit to control how many lines to display before truncating (1-5, default: 1).
- Nested
- When using multiple Group by dimensions, enable this option to show the legend in a hierarchical format.
The following examples show various configuration options for building impactful treemap charts.
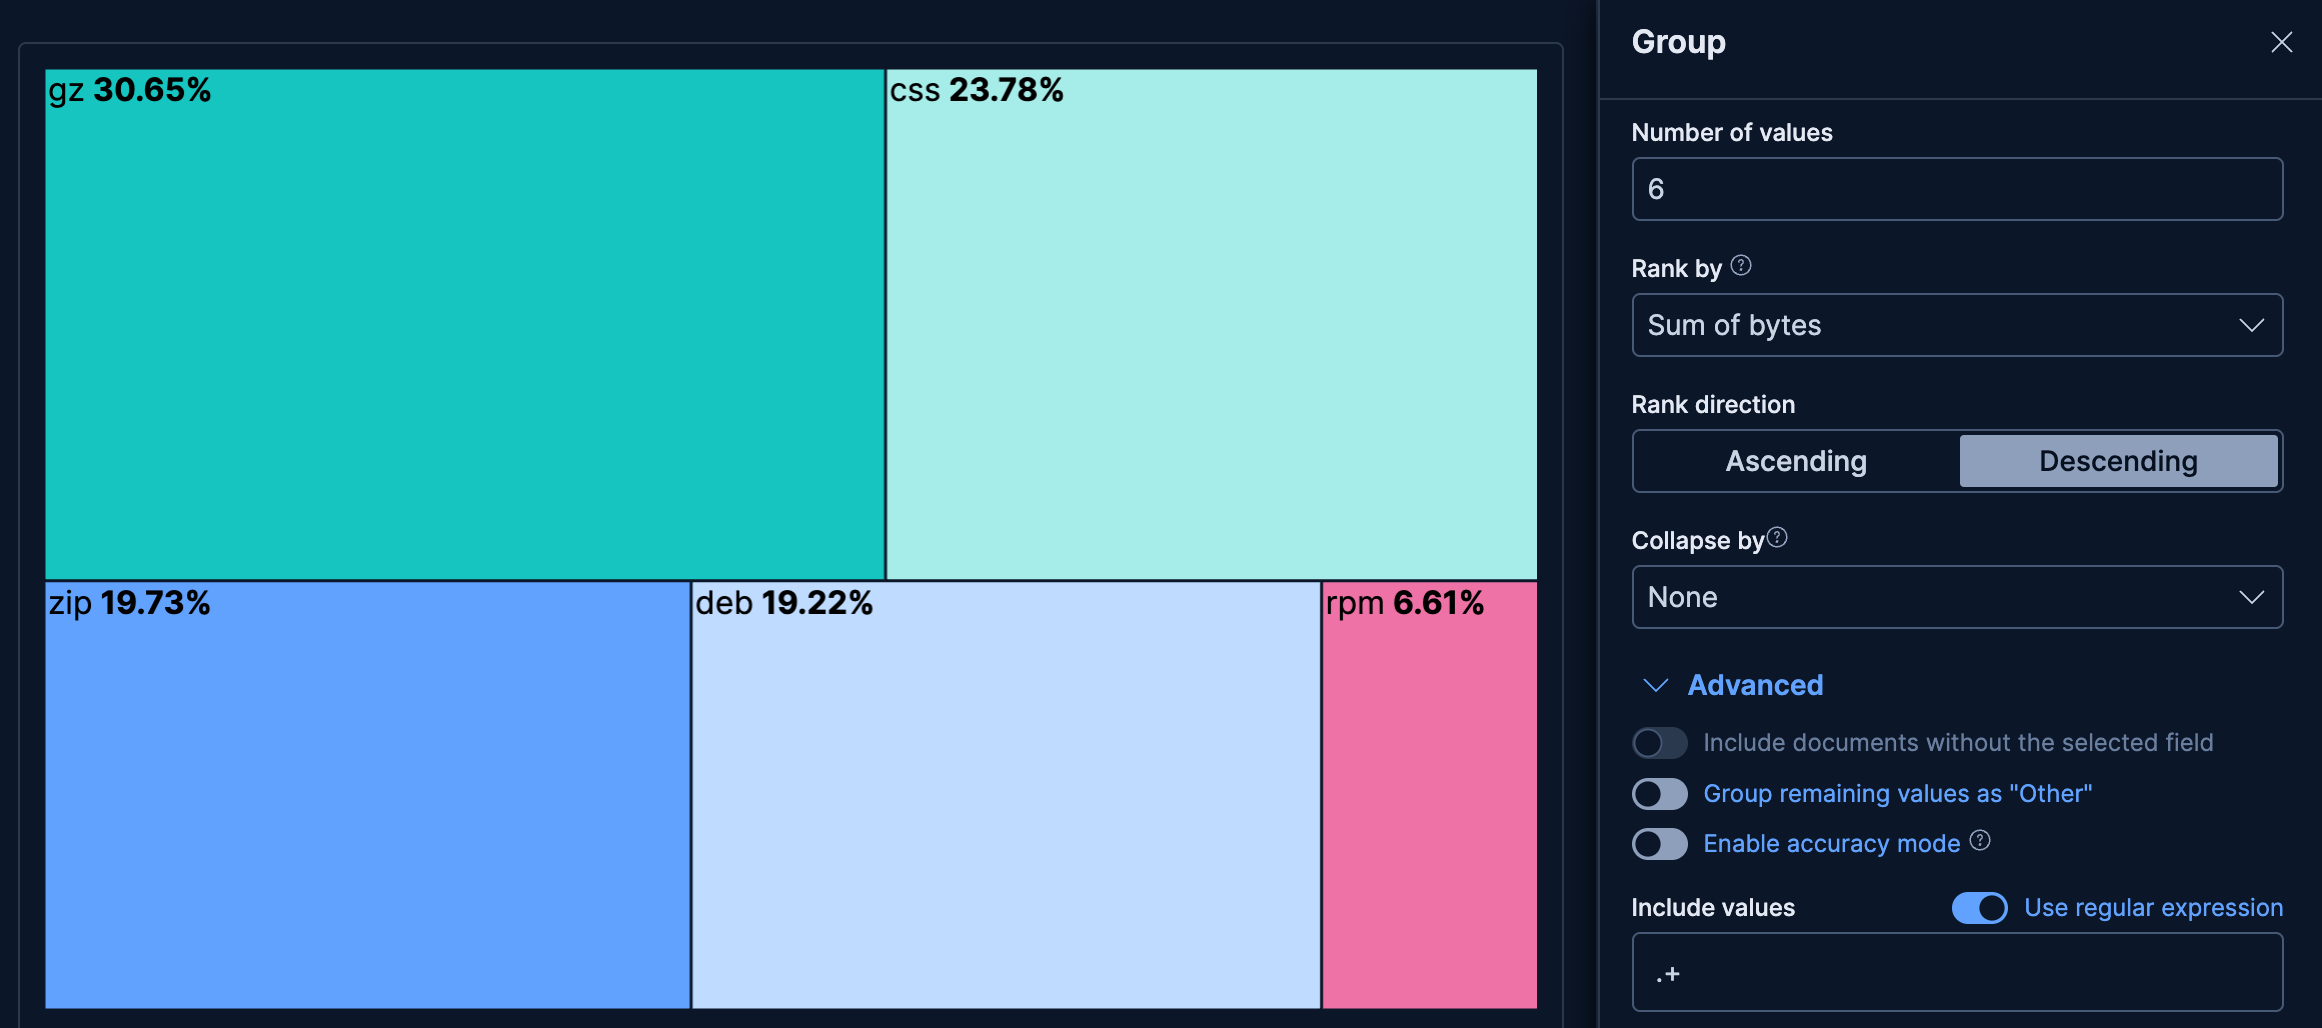
- Bytes per file extension
-
See which file extensions consume the most bandwidth, excluding blank values:
- Example based on: Kibana Sample Data Logs
- Group by:
extension.keyword- Top 6 values
- Advanced: include values matching the
.+regular expression to exclude blank values
- Metric: Sum of
bytes - Value display: Percentage
Serverless Stack GA 9.5+ … Create this chart using the API
This example creates a single-level treemap where each rectangle represents a file extension and its size reflects total bandwidth consumed.
These API request examples are kept up to date with the latest version of the APIs, so some fields might differ if you're using an earlier version. For a history of breaking changes, refer to the Kibana breaking changes or the Elastic Cloud Serverless breaking changes.
POST kbn://api/visualizations{ "type": "treemap", "title": "Bytes per file extension", "filters": [], "query": { "expression": "" }, "legend": { "size": "auto" }, "metrics": [ { "operation": "sum", "field": "bytes", "label": "Total bytes", "format": { "type": "number" }, "filter": { "expression": "" } } ], "group_by": [ { "operation": "terms", "fields": ["extension.keyword"], "limit": 6, "includes": { "values": [".+"], "as_regex": true }, "other_bucket": { "include_documents_without_field": false }, "rank_by": { "type": "metric", "direction": "desc", "metric_index": 0 }, "increase_accuracy": true } ], "data_source": { "type": "data_view_spec", "index_pattern": "kibana_sample_data_logs", "time_field": "timestamp" }, "styling": { "values": { "mode": "percentage" } } }
treemaprenders nested rectangles whose area is proportional to the metric value.- The
termsgrouping limits to the top 6 extensions ranked bysum of bytes(descending), usesincludeswithas_regex: trueand pattern.+to exclude blank values, groups any remaining extensions into an Other bucket, and enables accuracy mode. percentagedisplays each extension's share of total bytes instead of the raw count.
curl -X POST "${KIBANA_URL}/api/visualizations" \
  -H "Authorization: ApiKey ${API_KEY}" \
  -H "kbn-xsrf: true" \
  -H "Content-Type: application/json" \
  -d '{
  "type": "treemap",
  "title": "Bytes per file extension",
  "filters": [],
  "query": { "expression": "" },
  "legend": { "size": "auto" },
  "metrics": [
    {
      "operation": "sum",
      "field": "bytes",
      "label": "Total bytes",
      "format": {
        "type": "number"
      },
      "filter": { "expression": "" }
    }
  ],
  "group_by": [
    {
      "operation": "terms",
      "fields": ["extension.keyword"],
      "limit": 6,
      "includes": { "values": [".+"], "as_regex": true },
      "other_bucket": { "include_documents_without_field": false },
      "rank_by": { "type": "metric", "direction": "desc", "metric_index": 0 },
      "increase_accuracy": true
    }
  ],
  "data_source": {
    "type": "data_view_spec",
    "index_pattern": "kibana_sample_data_logs",
    "time_field": "timestamp"
  },
  "styling": { "values": { "mode": "percentage" } }
}'
treemaprenders nested rectangles whose area is proportional to the metric value.- The
termsgrouping limits to the top 6 extensions ranked bysum of bytes(descending), usesincludeswithas_regex: trueand pattern.+to exclude blank values, groups any remaining extensions into an Other bucket, and enables accuracy mode. percentagedisplays each extension's share of total bytes instead of the raw count.
For more information, refer to the Visualizations API.
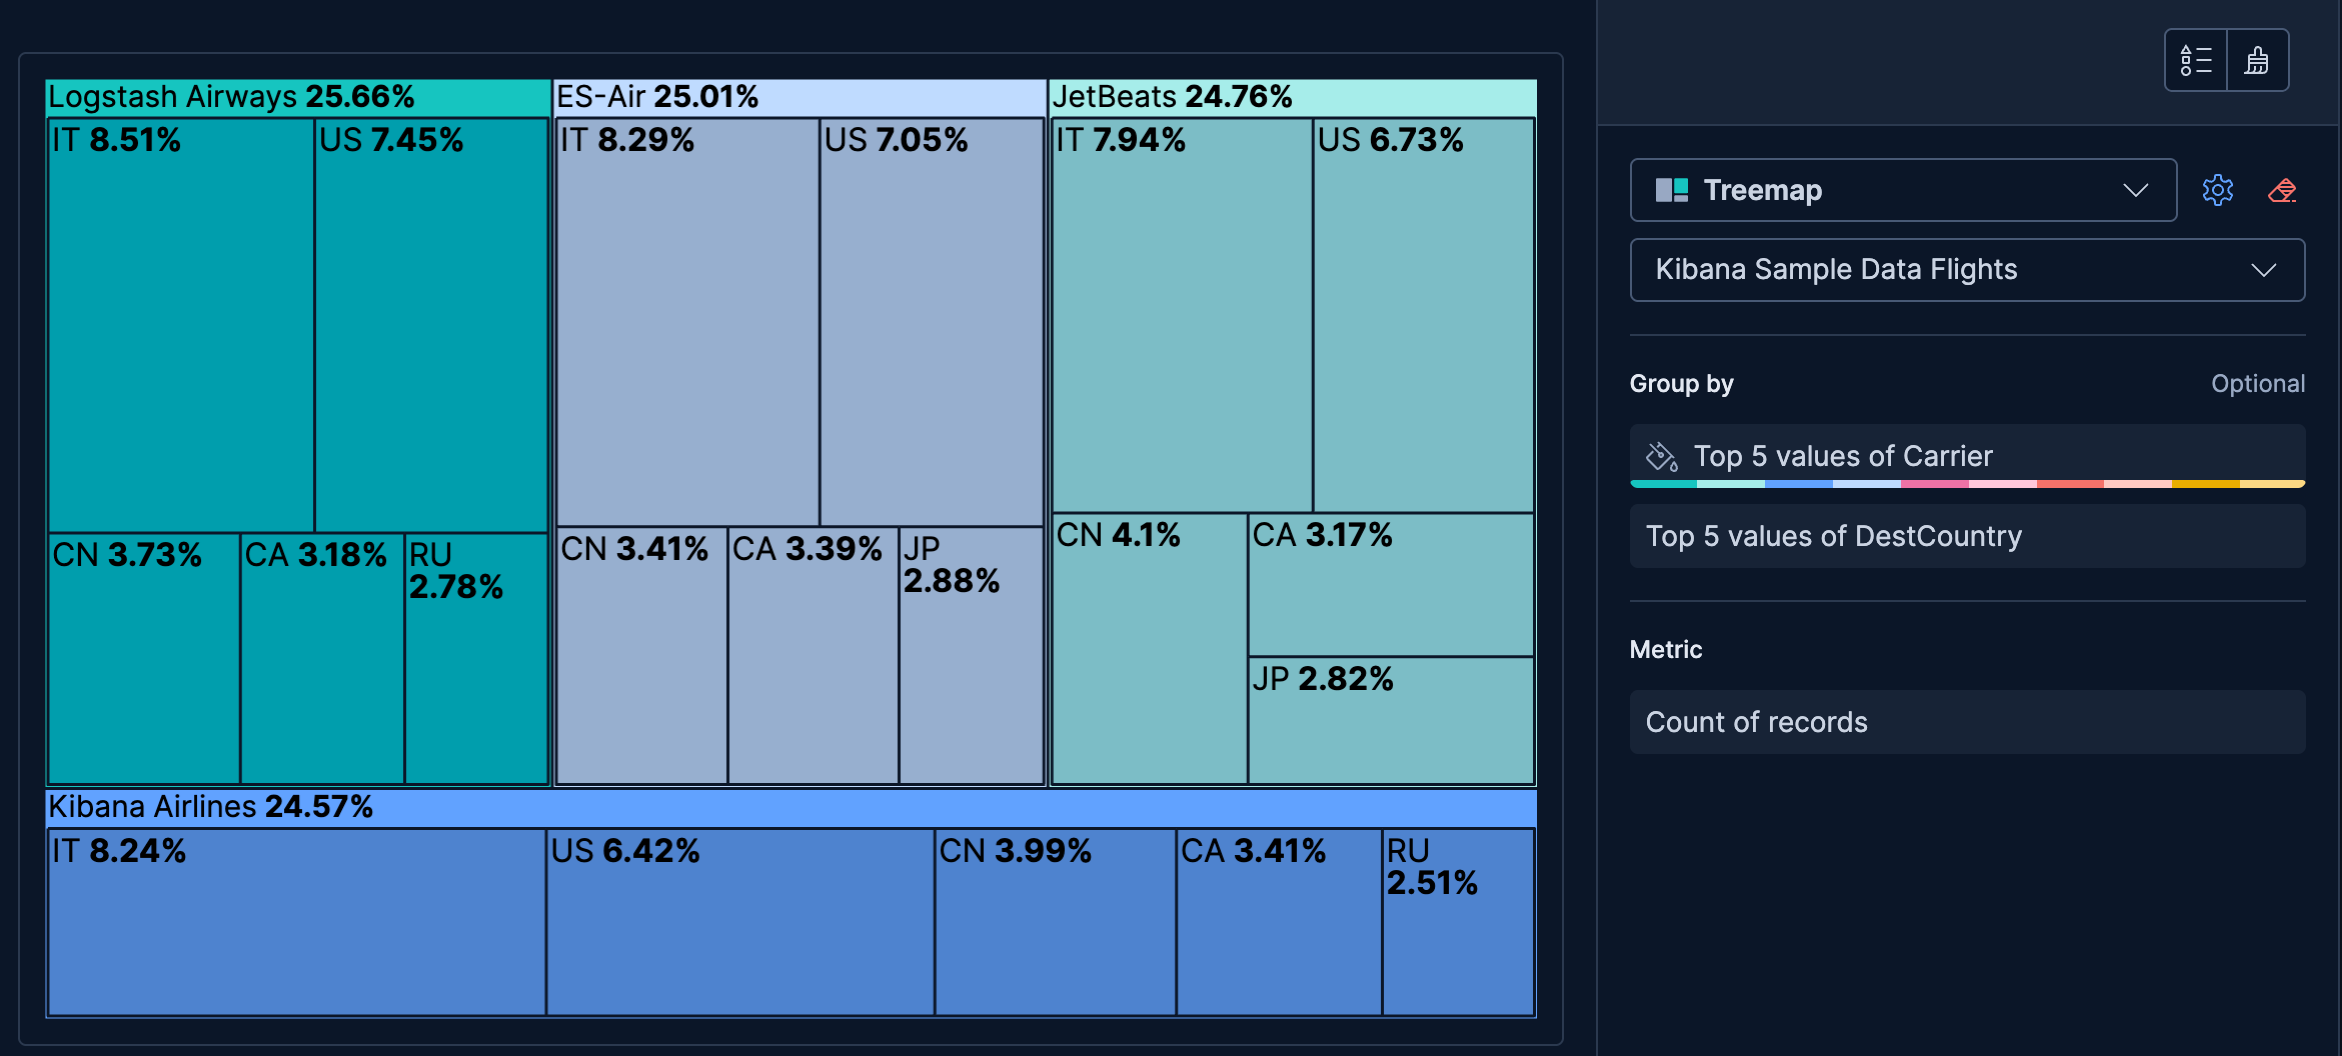
- Flights by carrier and destination country
-
Show how flight volume is distributed across airlines and their destination countries, using two hierarchy levels:
- Example based on: Kibana Sample Data Flights
- Group by (Level 1):
Carrier(Top 5 values) - Group by (Level 2):
DestCountry(Top 5 values) - Metric: Count
- Value display: Percentage
Serverless Stack GA 9.5+ … Create this chart using the API
This example creates a two-level treemap: the outer rectangles represent airlines and the inner rectangles show destination countries, revealing how each carrier's flight volume is distributed geographically.
These API request examples are kept up to date with the latest version of the APIs, so some fields might differ if you're using an earlier version. For a history of breaking changes, refer to the Kibana breaking changes or the Elastic Cloud Serverless breaking changes.
POST kbn://api/visualizations{ "type": "treemap", "title": "Flights by carrier and destination country", "filters": [], "query": { "expression": "" }, "legend": { "size": "auto" }, "metrics": [ { "operation": "count", "label": "Flights", "format": { "type": "number" }, "filter": { "expression": "" } } ], "group_by": [ { "operation": "terms", "fields": ["Carrier"], "limit": 5 }, { "operation": "terms", "fields": ["DestCountry"], "limit": 5 } ], "data_source": { "type": "data_view_spec", "index_pattern": "kibana_sample_data_flights", "time_field": "timestamp" }, "styling": { "values": { "mode": "percentage" } } }
- The first
group_byentry creates the outer (parent) rectangles, one per airline carrier. - The second
group_byentry nests destination countries inside each carrier, forming the two-level hierarchy.
curl -X POST "${KIBANA_URL}/api/visualizations" \
  -H "Authorization: ApiKey ${API_KEY}" \
  -H "kbn-xsrf: true" \
  -H "Content-Type: application/json" \
  -d '{
  "type": "treemap",
  "title": "Flights by carrier and destination country",
  "filters": [],
  "query": { "expression": "" },
  "legend": { "size": "auto" },
  "metrics": [
    {
      "operation": "count",
      "label": "Flights",
      "format": { "type": "number" },
      "filter": { "expression": "" }
    }
  ],
  "group_by": [
    {
      "operation": "terms",
      "fields": ["Carrier"],
      "limit": 5
    },
    {
      "operation": "terms",
      "fields": ["DestCountry"],
      "limit": 5
    }
  ],
  "data_source": {
    "type": "data_view_spec",
    "index_pattern": "kibana_sample_data_flights",
    "time_field": "timestamp"
  },
  "styling": { "values": { "mode": "percentage" } }
}'
- The first
group_byentry creates the outer (parent) rectangles, one per airline carrier. - The second
group_byentry nests destination countries inside each carrier, forming the two-level hierarchy.
For more information, refer to the Visualizations API.
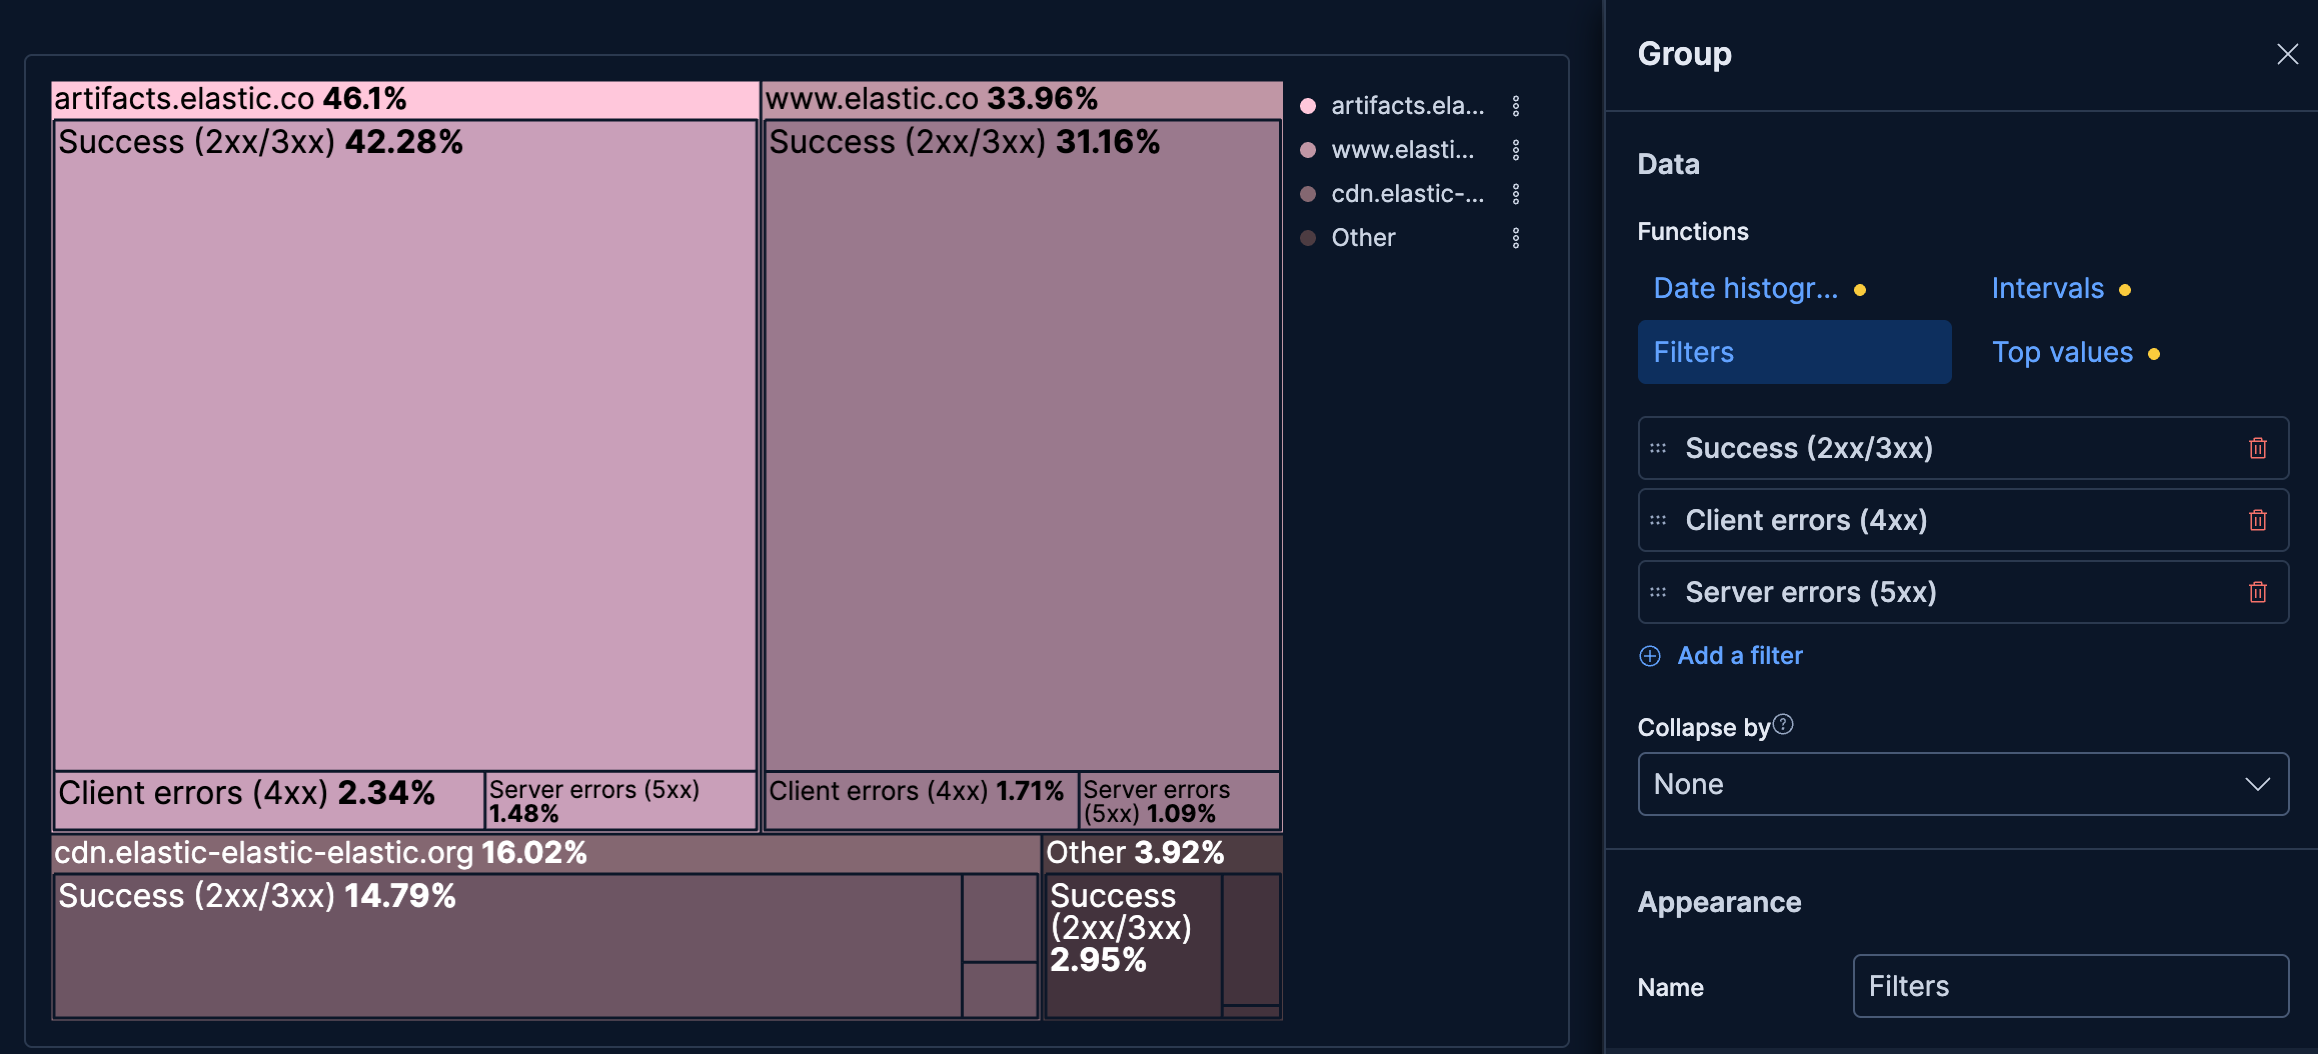
- Response status per host
-
See which hosts handle the most traffic and how their response status breaks down:
- Example based on: Kibana Sample Data Logs
- Group by (Level 1):
host.keyword(Top 3 values, with Other) - Group by (Level 2): Filters
- "Success (2xx/3xx)":
response.keyword >= "200" AND response.keyword < "400" - "Client errors (4xx)":
response.keyword >= "400" AND response.keyword < "500" - "Server errors (5xx)":
response.keyword >= "500"
- "Success (2xx/3xx)":
- Metric: Count
- Value display: Percentage
- Color: Gradient (
#ffc7db), reversed
Serverless Stack GA 9.5+ … Create this chart using the API
This example nests KQL-based response status categories inside host rectangles, combining terms and filters groupings to show both traffic volume and health per host.
These API request examples are kept up to date with the latest version of the APIs, so some fields might differ if you're using an earlier version. For a history of breaking changes, refer to the Kibana breaking changes or the Elastic Cloud Serverless breaking changes.
POST kbn://api/visualizations{ "type": "treemap", "title": "Response status per host", "filters": [], "query": { "expression": "" }, "legend": { "size": "auto" }, "metrics": [ { "operation": "count", "label": "Count", "format": { "type": "number" }, "filter": { "expression": "" } } ], "group_by": [ { "operation": "terms", "fields": ["host.keyword"], "limit": 3, "other_bucket": { "include_documents_without_field": false }, "color": { "mode": "gradient", "palette": "default", "gradient": [{ "type": "color_code", "value": "#ffc7db" }], "sort": "desc" } }, { "operation": "filters", "filters": [ { "filter": { "expression": "response.keyword >= \"200\" AND response.keyword < \"400\"" }, "label": "Success (2xx/3xx)" }, { "filter": { "expression": "response.keyword >= \"400\" AND response.keyword < \"500\"" }, "label": "Client errors (4xx)" }, { "filter": { "expression": "response.keyword >= \"500\"" }, "label": "Server errors (5xx)" } ] } ], "data_source": { "type": "data_view_spec", "index_pattern": "kibana_sample_data_logs", "time_field": "timestamp" }, "styling": { "values": { "mode": "percentage" } } }
- The top-level
termsgrouping creates one outer rectangle per host, sized by total request count.other_bucketadds an "Other" segment for hosts outside the top 3. Thecolorgradient applies a pink hue (#ffc7db) across the host values, reversed withsort: "desc"to match the UI example. - The nested
filtersgrouping splits each host rectangle into success, client error, and server error segments using KQL queries.
curl -X POST "${KIBANA_URL}/api/visualizations" \
  -H "Authorization: ApiKey ${API_KEY}" \
  -H "kbn-xsrf: true" \
  -H "Content-Type: application/json" \
  -d '{
  "type": "treemap",
  "title": "Response status per host",
  "filters": [],
  "query": { "expression": "" },
  "legend": { "size": "auto" },
  "metrics": [
    {
      "operation": "count",
      "label": "Count",
      "format": { "type": "number" },
      "filter": { "expression": "" }
    }
  ],
  "group_by": [
    {
      "operation": "terms",
      "fields": ["host.keyword"],
      "limit": 3,
      "other_bucket": { "include_documents_without_field": false },
      "color": {
        "mode": "gradient",
        "palette": "default",
        "gradient": [{ "type": "color_code", "value": "#ffc7db" }],
        "sort": "desc"
      }
    },
    {
      "operation": "filters",
      "filters": [
        {
          "filter": { "expression": "response.keyword >= \"200\" AND response.keyword < \"400\"" },
          "label": "Success (2xx/3xx)"
        },
        {
          "filter": { "expression": "response.keyword >= \"400\" AND response.keyword < \"500\"" },
          "label": "Client errors (4xx)"
        },
        {
          "filter": { "expression": "response.keyword >= \"500\"" },
          "label": "Server errors (5xx)"
        }
      ]
    }
  ],
  "data_source": {
    "type": "data_view_spec",
    "index_pattern": "kibana_sample_data_logs",
    "time_field": "timestamp"
  },
  "styling": { "values": { "mode": "percentage" } }
}'
- The top-level
termsgrouping creates one outer rectangle per host, sized by total request count.other_bucketadds an "Other" segment for hosts outside the top 3. Thecolorgradient applies a pink hue (#ffc7db) across the host values, reversed withsort: "desc"to match the UI example. - The nested
filtersgrouping splits each host rectangle into success, client error, and server error segments using KQL queries.
For more information, refer to the Visualizations API.